Message Converter ?
이번 포스팅은 스프링의 핵심 기능중 하나인 메시지 컨버터(Message Converter)에 관하여 다루어 보도록 하겠습니다.
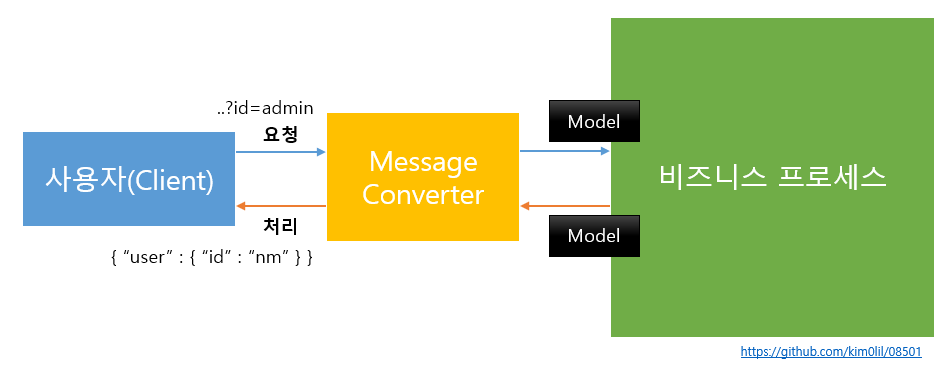
메시지 컨버터는 서버로 들어 오는 데이터를 오브젝트로 가공하거나 비즈니스단에서 처리 된 오브젝트를 http 메시지로 변환하는 역활을 담당하고 있습니다.
쉽게 그림으로 표현하면 아래와 같습니다.
스프링에서는 @EnableWebMvc어노테이션을 사용하여 4가지의 기본 메시지 컨버터들을 등록할 수 있게 되어 있습니다.
아래는 그 코드들 중 하나입니다.
WebMvcConfigurationSupport 클래스 중에서
protected final void addDefaultHttpMessageConverters(List<HttpMessageConverter<?>> messageConverters) {
    messageConverters.add(new ByteArrayHttpMessageConverter());
    messageConverters.add(new StringHttpMessageConverter());
    messageConverters.add(new ResourceHttpMessageConverter());
    messageConverters.add(new ResourceRegionHttpMessageConverter());
    ...
}- ByteArrayHttpMessageConverter : byte[]을 읽고 쓰는 메시지 컨버터
- StringHttpMessageConverter : String을 읽고 쓰는 메시지 컨버터
- ResourceHttpMessageConverter : interface Resource을 읽고 쓰는 메시지 컨버터
- ResourceRegionHttpMessageConverter : interface ResourceRegion을 읽고 쓰는 메시지 컨버터
또한 Gson, Atom, Rss, Jackson, xml과 같은 규격을 의존성에 등록 할 경우 스프링에서는 이와 같은 변화를 감지하여 각 메시지 컨버터를 등록 하도록 하고 있습니다.
public class WebMvcConfigurationSupport {

	private static final boolean romePresent;

	private static final boolean jaxb2Present;

	private static final boolean jackson2Present;

	private static final boolean jackson2XmlPresent;

	private static final boolean jackson2SmilePresent;

	private static final boolean jackson2CborPresent;

	private static final boolean gsonPresent;

	private static final boolean jsonbPresent;

	static {
		ClassLoader classLoader = WebMvcConfigurationSupport.class.getClassLoader();
		romePresent = ClassUtils.isPresent("com.rometools.rome.feed.WireFeed", classLoader);
		jaxb2Present = ClassUtils.isPresent("javax.xml.bind.Binder", classLoader);
		jackson2Present = ClassUtils.isPresent("com.fasterxml.jackson.databind.ObjectMapper", classLoader) &&
				ClassUtils.isPresent("com.fasterxml.jackson.core.JsonGenerator", classLoader);
		jackson2XmlPresent = ClassUtils.isPresent("com.fasterxml.jackson.dataformat.xml.XmlMapper", classLoader);
		jackson2SmilePresent = ClassUtils.isPresent("com.fasterxml.jackson.dataformat.smile.SmileFactory", classLoader);
		jackson2CborPresent = ClassUtils.isPresent("com.fasterxml.jackson.dataformat.cbor.CBORFactory", classLoader);
		gsonPresent = ClassUtils.isPresent("com.google.gson.Gson", classLoader);
		jsonbPresent = ClassUtils.isPresent("javax.json.bind.Jsonb", classLoader);
	}

    // ..

    protected final void addDefaultHttpMessageConverters(List<HttpMessageConverter<?>> messageConverters) {

        // ..

		if (jackson2XmlPresent) {
			Jackson2ObjectMapperBuilder builder = Jackson2ObjectMapperBuilder.xml();
			if (this.applicationContext != null) {
				builder.applicationContext(this.applicationContext);
			}
			messageConverters.add(new MappingJackson2XmlHttpMessageConverter(builder.build()));
		}
		else if (jaxb2Present) {
			messageConverters.add(new Jaxb2RootElementHttpMessageConverter());
		}

		if (jackson2Present) {
			Jackson2ObjectMapperBuilder builder = Jackson2ObjectMapperBuilder.json();
			if (this.applicationContext != null) {
				builder.applicationContext(this.applicationContext);
			}
			messageConverters.add(new MappingJackson2HttpMessageConverter(builder.build()));
		}
		else if (gsonPresent) {
			messageConverters.add(new GsonHttpMessageConverter());
		}
		else if (jsonbPresent) {
			messageConverters.add(new JsonbHttpMessageConverter());
		}

        // ..
    }

    // ..
}
그럼 기본적으로 메시지 컨버터의 관련된 내용은 끝났습니다.
다음은 직접 메시지 컨버터를 만들어 보면서 실제적으로 메시지 컨버터가 동작하는 원리와 순서를 알아 보도록 하겠습니다.
실습
메시지 컨버터를 활용하여 Json API 생성
준비
간단하게 실습을 해보도록 하겠습니다.
먼저 메시지 컨버터를 활용할 컨트롤러와 설정 파일을 만들어 모델을 매핑하기 위한 준비 작업을 하겠습니다.
< Configuration >
@Controller
public class AppController { }
< Controller >
@EnableWebMvc
@ComponentScan(basePackageClasses = ApplicationConfiguration.class)
public class ApplicationConfiguration implements WebMvcConfigurer {
	@Override
	public void extendMessageConverters(List<HttpMessageConverter<?>> converters) {

	}
}
메시지 컨버터를 설명하면서 @EnableWebMvc에서 기본적인 매핑전략을 사용하여 메시지 핸들러를 매핑하는 전략을 등록한다고 하였습니다.
그 외에도 @EnableWebMvc에서는 WebMvcConfigurerComposite을 통하여 빈으로 등록 된 WebMvcConfigurer을 구현한 설정 파일들을 조회 합니다.
public class DelegatingWebMvcConfiguration extends WebMvcConfigurationSupport {

	private final WebMvcConfigurerComposite configurers = new WebMvcConfigurerComposite();

	// WebMvcConfigurer 인터페이스를 구현한 빈을 찾아 리스트에 등록 합니다.
	@Autowired(required = false)
	public void setConfigurers(List<WebMvcConfigurer> configurers) {
		if (!CollectionUtils.isEmpty(configurers)) {
			this.configurers.addWebMvcConfigurers(configurers);
		}
	}

	// ...

	// 후처리 이벤트(configureMessageConverters)를 통하여 설정을 확장합니다.
	@Override
	protected void extendMessageConverters(List<HttpMessageConverter<?>> converters) {
		this.configurers.extendMessageConverters(converters);
	}

	// ...
}
따라서 ApplicationConfiguration에 @EnableWebMvc을 추가한 다음 실제 설정에 참여할 WebMvcConfigurer를 구현하여 설정에 참여할 수 있도록 한 것입니다.
두 설정 파일이 완료 되었으면 이번에는 web.xml을 대신할 ApplicationInitializer를 생성하러 가보겠습니다.
(ApplicationInitializer은 web.xml을 대신하여 서블릿의 부팅 시 이벤트에 참여 하는 역활을 합니다.)
public class ApplicationInitializer
	extends AbstractAnnotationConfigDispatcherServletInitializer {

	@Override
	protected Class<?>[] getRootConfigClasses() {
		return null;
	}

	@Override
	protected Class<?>[] getServletConfigClasses() {
		return new Class[] { ApplicationConfiguration.class };
	}

	@Override
	protected String[] getServletMappings() {
		return new String[] { "/" };
	}

}
실제 서비스할 도메인을 만들어 보겠습니다.
도메인은 간단한 실습을 위하여 Todo를 위한 도메인을 작성해 보겠습니다.
public class Todo {

	public int getId() {
		return id;
	}
	public void setId(int id) {
		this.id = id;
	}
	public String getContents() {
		return contents;
	}
	public void setContents(String contents) {
		this.contents = contents;
	}

	public Todo() { }

	public Todo(int id, String contents) {
		this.id = id;
		this.contents = contents;
	}

	private int id;
	private String contents;
}
메시지 컨버터를 실습하기 위한 모든 준비는 끝났습니다.
이제 실제로 메시지 컨버터를 생성하고 설정에 추가하여 사용 해보도록 하겠습니다.
메시지 컨버터
가장 먼저 메시지 컨버터를 생성해 보도록 하겠습니다.
메시지 컨버터는 AbstractHttpMessageConverter를 추상화한 클래스를 구현함으로써 설정에 쉽게 참여할 수 있습니다.
public class TodoMessageConverter extends AbstractHttpMessageConverter<Todo>{

	public TodoMessageConverter() {
		super();
	}

	@Override
	protected boolean supports(Class<?> clazz) {
		return false;
	}

	@Override
	protected Todo readInternal(Class<? extends Todo> clazz, HttpInputMessage inputMessage)
			throws IOException, HttpMessageNotReadableException {
		return null;
	}

	@Override
	protected void writeInternal(Todo t, HttpOutputMessage outputMessage)
			throws IOException, HttpMessageNotWritableException {

	}
}
각 메서드에 관하여 간단히 설명 후 넘어 가겠습니다.
| 메서드 | 설명 |
|---|---|
| TodoMessageConverter | 클래스의 기본 생성자이며 상위 구현체(super)에 접근하여 Content-Type을 제한할 수 있습니다. |
| supports | 메시지 컨버트가 처리 가능한 클래스(Model)을 검사할 때 사용합니다. |
| readInternal | 파라미터에 @RequestBody가 등록 될 경우 HttpInputMessage를 통하여 데이터를 활용하여 Model을 구현/생성할(consume) 책임을 지니고 있습니다. |
| writeInternal | 반환 타입에 @ResponseBody가 등록 될 경우 HttpOutputMessage를 통하여 Model을 활용하여 사용자에게 데이터를 서비스할(produces) 책임을 지니고 있습니다. |
MediaType
먼저 미디어 타입에 관하여 알아 보겠습니다.
미디어 타입은 http통신 시에 포맷과 콘텐츠를 분류 하고 식별하기 위하여 헤더에 등록하는 값이며 미디어 타입(media type), MIME 타입(MIME type), 콘텐츠 타입(content type) 등이 같은 말이라고 생각하면 편합니다.
이러한 값을 통하여 메시지 컨버터에서는 입력값과 반환값을 처리하도록 권장하며 우리의 todo에서는 application/todo라는 특수한 미디어 타입을 생성하여 처리해 보도록 하겠습니다.
public class TodoMessageConverter extends AbstractHttpMessageConverter<Todo>{

	public TodoMessageConverter() {
		super(new MediaType("application","todo"));
	}

	// ...
}
supports
파라미터에 @RequestBody또는 @ResponseBody 가 있을 경우 스프링은 컨테이너에 등록 되어 있는 메시지 컨버터의 supports 메서드를 사용하여 처리 가능한 처리기를 찾습니다.
따라서 가장 먼저 해당 처리기에 이전 생성한 model(Todo)의 class를 매핑 하도록 하겠습니다.
public class TodoMessageConverter extends AbstractHttpMessageConverter<Todo>{

	// ...

	@Override
	protected boolean supports(Class<?> clazz) {
		return ( Todo.class == clazz );
	}

	// ...
}
readInternal
다음은 입력을 model로 변환하는 메서드 입니다.
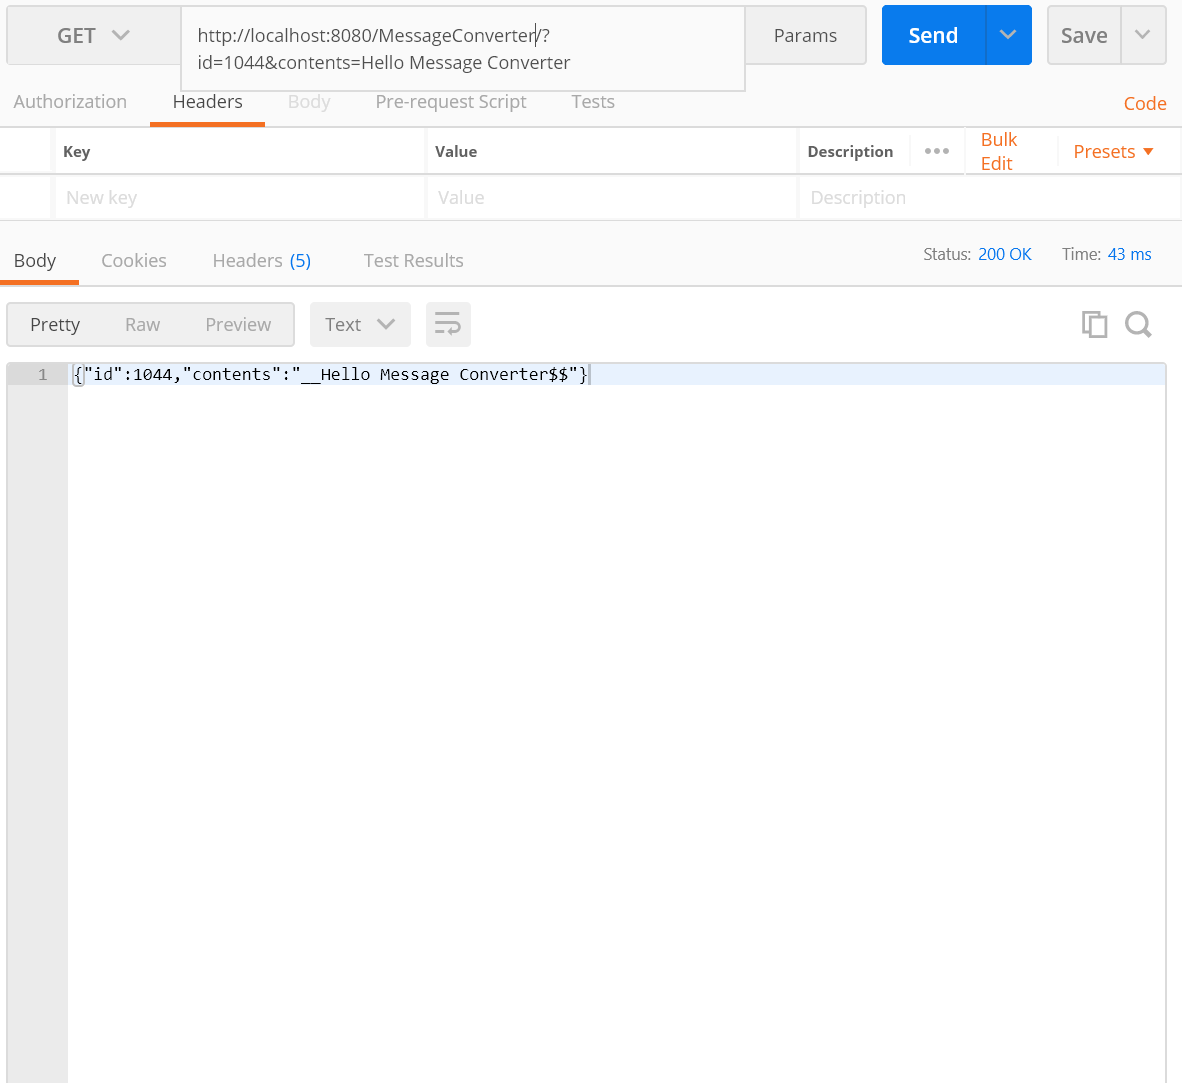
우리는 입력 폼을 아래와 같이 파라미터 형식으로 전달 받을 것입니다.
url?id=*&contents=*
따라서 파라미터를 받아온 다음 해당 파라미터를 오브젝트로 변환하는 역활을 담당하게 될 것입니다.
public class TodoMessageConverter extends AbstractHttpMessageConverter<Todo>{

	// ...

	@Override
	protected Todo readInternal(Class<? extends Todo> clazz, HttpInputMessage httpInputMessage)
			throws IOException, HttpMessageNotReadableException {

		HttpServletRequest httpRequest = ((ServletRequestAttributes) RequestContextHolder.currentRequestAttributes()).getRequest();

		String id       = httpRequest.getParameter("id");
		String contents = httpRequest.getParameter("contents");

		Todo todo = new Todo(Integer.parseInt(id), contents);

		return todo;
	}

	// ...

}
writeInternal
마지막 메서드로는 반환시 도메인(object)를 처리하는 처리기를 등록하겠습니다.
기본적으로 컨트롤러 단에서 처리기의 필요한 도메인 객체가 넘어 오게 되어 있으므로 해당 오브젝트를 사용하여 사용자가 필요한 정보(포맷, 형식)로 도메인을 변환을 하도록 합니다.
public class TodoMessageConverter extends AbstractHttpMessageConverter<Todo>{

	// ...


	@Override
	protected void writeInternal(Todo todo, HttpOutputMessage httpOutputMessage)
			throws IOException, HttpMessageNotWritableException {

		// 문자열 빌드를 위하여 빌더 사용
		StringBuilder builder = new StringBuilder();

	    builder.append("{");
	    builder.append("\"id\":{id},");
	    builder.append("\"contents\":\"{contents}\"");
	    builder.append("}");

		// 사용자가 필요한 정보(포맷, 형식)로 도메인을 변환
		String template = builder.toString();

	    template = template.replace("{id}"      , Integer.toString(todo.getId()));
	    template = template.replace("{contents}", todo.getContents());

		OutputStream outputStream = httpOutputMessage.getBody();

	    outputStream.write(template.getBytes());
	    outputStream.close();
	}

	// ...

}
실행
실행을 위해서는 이전 설정 파일로 돌아간 다음 WebMvcConfigurer의 구현체로써 extendMessageConverters메소드에 우리가 만든 TodoMessageConverter를 추가하도록 하겠습니다.
@EnableWebMvc
@ComponentScan(basePackageClasses = ApplicationConfiguration.class)
public class ApplicationConfiguration implements WebMvcConfigurer {

	@Override
	public void extendMessageConverters(List<HttpMessageConverter<?>> converters) {
		converters.add(new TodoMessageConverter());
	}
}
이렇게 하면 이제 메시지 컨버터가 WebMvcConfigurerComposite에 등록 되게 되며 해당 메시지 컨버터를 순회하면서 처리하도록 될 것입니다.
이제는 실제 사용자의 요청을 받을 컨트롤러를 생성하겠습니다.
컨트롤러는 간단하게 컨텐츠에 __를 접두사로 붙이고 $$를 접미사로 붙여 주는 간단한 컨트롤러를 생성하겠습니다.
@Controller
public class AppController {

	private final String prefix = "__";
	private final String suffix = "$$";

	@RequestMapping(value= {"/",""}, produces="application/todo")
	@ResponseBody
	public Todo home(Todo todo) {

		todo.setContents(prefix + todo.getContents() + suffix);

		return todo;
	}
}
이제 포스트맨과 같은 테스팅 툴을 사용하여 실행 결과를 확인해 보세요